Can't restore my broken external harddrive

I’m really a novice in the duplicacy and restoring business, så I’m kind a lost here. Any help will be greatly appreciated.

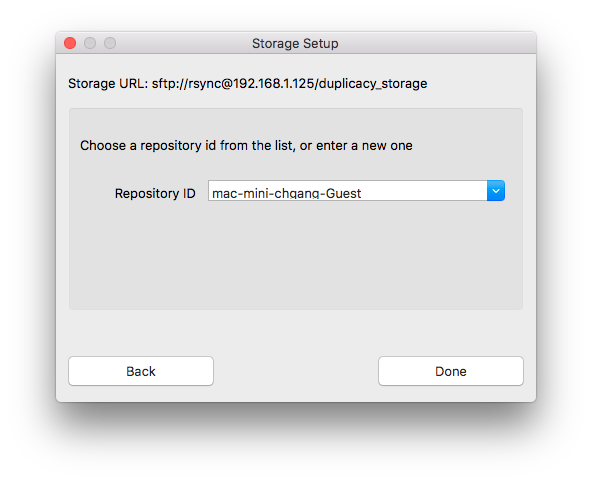
In the Duplicacy Guide (Duplicacy User Guide) it says that I can restore to a different directory/computer by creating “a new repository using the destination directory, and the same storage”.

And that’s what I thought I had done!? But so far without any luck.

What I’ve tried so far is the following:
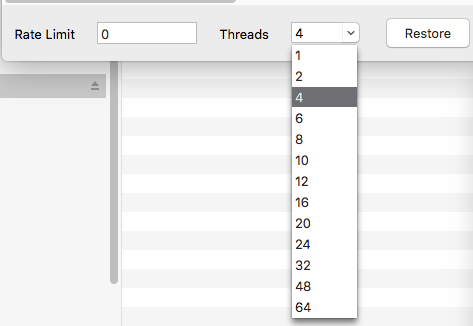
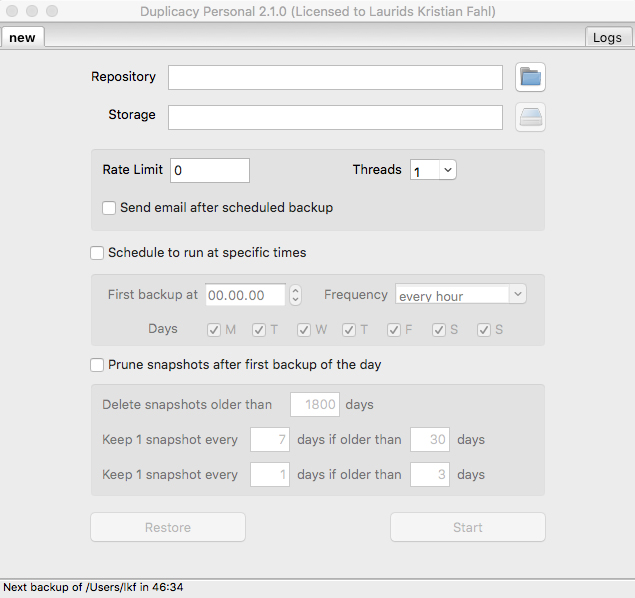
  1. Created a new job
  2. In “Repository” I entered the location of the new folder on a new external disk
  3. In “storage” I chose the BackBlaze B2-bucket where the backup (619.7 GB) is located.

But when I then click “Restore”, I get an error message saying: “No previous revisions found”!

Any idea what I’m doing wrong?

In advance: Thanks
Laurids

I am not using the GUI, but this is what i expect to be needed:

  • use the same storage (backblaze in your case)
  • use whichever local folder you want to restore to (duplicacy won’t complain)
  • use the same repository ID (snapshot ID) you used when backing up.

I think you might have used a different repository id when you set the new folder.

1 Like

Dear TheBestPessimist

Thanks – and forgive me if I might not understand.

When I create a new job, I have to fill in two things: “Repository” and “Storage”:

  • Storage: I use the same storage, just as you suggest
  • Local folder: Where is that? Where and how do I choose which folder to restore to?
  • Repository ID: In the Repository field I have to choose an existing folder, but the original folder is on the damaged external drive, and hence unavaliable.

???

Regards

@gchen, could you help here please?

From that screenshot, i guess that what you did in the OP is correct.
In that case, can you go into backblaze folder > snapshots folder and tell me what it contains (it should be some folders), and also what each folder contains?

Lastly: can you also update to latest duplicacy version, 2.1.1?

1 Like

I guess that is because you used a new repository id for your new local folder. After you enter the bucket name and B2 credentials, the next step is to select the repository id as shown in this screenshot:

The default one is a new id generated from the hostname, the username, and the local folder. For restore, you need to pick the old one from the dropdown list that you used for your previous backups.

2 Likes

Dear gchen – and TheBestPessimist

You guys must be the smartes folks on earth since you apparently have succeed in guiding me through this. Impressive! You have my respect.

I’m still not sure I understand (that’s a lie: I really don’t understand), but your guidance combined withe several times of trial and error seemed to be the way for me. At least it seems that the restoring is now running. Hurray!

If more or new problems occur, I hope you will forgive writing you again!

All the best to the both of you
Laurids

2 Likes

Dear both – and now I’m already back (grrrr – sorry)

I’ve got my new external harddrive and startede to restore the backuped version of the broken harddrive using all the knowledge you provided me. Duplicacy starts to restore, but stops after a short period of time and have apparantly only restored the folder hierarchy – not the files ind the many folders.

What I do:

  1. After creating a new job and succesfully have filled out Repository and Storage, I click “Restore”…
  2. I then chose the latest revision and clicks “List files
  3. I then highlight the revision containing my Photo-library (*.photoslibrary) and clicks “Restore
  4. After a little while Duplicacy stops – as if the restore its done. But when I go to my new harddrive, Duplicacy has in fact re-createde a photolibrary, but as mentioned above it apparantly only contains the folder hierarchy.

As stated earlier the complete backup is as large as 619.7 GB – Is that a problem?

Apparantly I can restore single files one by one – but hopefully it’s possible to restore the entire library as a whole? Otherwise I’ll never get to the end!?

Please help. Again!

Best wishes,
Laurids

I have restored (albeit with CLI) one revision containing 3.7 TB of data (music, pics, and others – no videos – no files larger than 1 GB) and it worked w/o a hitch. restore works.

Now let’s see what @gchen sais: how you should continue.

I wonder if there’s a log file that you can share with us -> i suppose it’s somewhere in appdata folder, where duplicacy is installed.

Arrrggg – you have a lot of faith in me (and for that I thank you) – but I have absolutely no idea where to find this log file; sorry!

No probs. Just wait for gchen to solve this one for us :wink:

:+1:t4: I’m very grateful

I believe the restore operation encountered an error when retrying to restore some files. If you didn’t see any error message (or an error log) then it might be a bug in the GUI version. Upgrading to 2.1.1 may help.

Another option is to run the CLI version to restore. Open a DOS window, find out where the GUI version is installed (either :\Program Files (x86)\Duplicacy or C:\Users\username\AppData\Local\Duplicacy), then you’ll see the CLI executable there (or you can download one from Releases · gilbertchen/duplicacy · GitHub). Then run the following commands:

cd path\to\repository
path\to\duplicacy\cli restore -r revision

Dear gchen

I updated to 2.1.1 as soon as TheBestPessimist recommended it. So it can’t be that, I guess.

About the CLI solution (which I fear is to complicated for me) I would appreciate if you would try and guide me through the proces on a Mac. I don’t run Windows.

Please!?

Regards,
Laurids

I never worked with GUI or B2, you never worked with CLI (command line interface) so this will be a little more technical because i may forget steps.

  1. download this into your new repository: https://github.com/gilbertchen/duplicacy/releases/download/v2.1.1/duplicacy_osx_x64_2.1.1 (in the same folder where the folder.duplicacy exists – probably where you wanted to make your new restore).
  2. rename that file to dup for easier usage (in finder)
  3. open a terminal (cmd+space -> terminal) and now you have to move to your repository. that means you have to type cd someFolderName then enter, then again, and so on. This you should google.
  4. when you reach your repository (where dup file we downloaded is), run ./dup list to see all your revisions (and check that everything was setup correctly)
    • if it asks you for some passwords, you should provide now
  5. take a note of the revision number you want to restore (eg. 66). This probably is the latest revision (same number as in gui)
  6. run ./dup -d -log restore -r revision_number_from_above -threads 4
  7. wait for the restore to begin
    • if at some point it gives an error that you should run with -overwrite and the backup stops => just press up once to have the same command from #6 and add at the end -overwrite (note the space between all the command parameters in all my examples)

You may be able to solve it by running Duplicacy as root. First close the existing instance by clicking the icon on the menu bar and selecting quit. Then open a terminal and enter sudo open /Applications/Duplicacy.app and enter your login password as prompted.

If this still doesn’t help, then follow @TheBestPessimist’s instructions. Running the CLI is the most reliable way to fix errors like these.

Dear @gchen and @TheBestPessimist

Thanks – once more. Ordinary day work and family stuff came in the way. But now I’m at the computer again.

– didn’t work, unfortunately.

I got to no. 4 succesfully, but when I in the Terminal reached the repository where the dup file was downloaded and renamed to – and then ran ./dup list, Terminal said -bash: ./dup: Permission denied. And I hadn’t been asked for any passwords since I opened duplicacy as root (as @gchen suggested).

Any new advice?

PS:

What does

means? And why 4?

It’s also in the GUI version together with Rate Limit:

50

I’ve tried to Google both Rate Limit and Threads, but I don’t quite understand what I find (sorry).

You just need to run chmod u+x ./dup to make the file executable.

Thanks. That helped!

But after a short while the proces in Terminal stoped with this:

2018-08-18 18:11:05.021 ERROR RESTORE_CHOWN Failed to change uid or gid: chown /Volumes/TOSHIBA EXT/Foto-bibliotek-restore-mappe/Fotos-bibliotek.photoslibrary/private/com.apple.photoanalysisd/GraphService/PhotosGraph/liveupdate-photosgraph.graphdb-wal: operation not permitted

I guess I’m followed by bad luck. Or what?

Run #6 in my details with sudo in front (you may need to use -overwrite):
either: sudo ./dup -d -log restore -r revision_number_from_above -threads 4
or sudo dup -d -log restore -r revision_number_from_above -threads 4

You should start by searching for your problem.
Most likely you will find the #how-to guides (there’s plenty).
In our particular case there is this one: Restore command details which explains that -threads sets the number of downloading threads to 4 – just a random number i chose to improve the speed without killing your internet.